
Textual Tutorial
1. Model your object in your software of choice
2. Triangulate your object (if you do not do this, the program will fail)
3. Export your object as a .obj with the following settings (Cinema4D)
2. Triangulate your object (if you do not do this, the program will fail)
3. Export your object as a .obj with the following settings (Cinema4D)
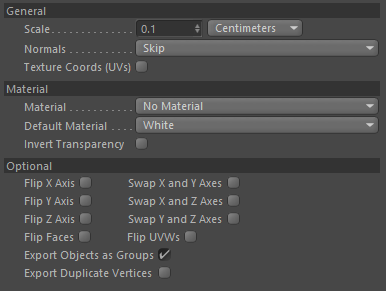
note: by checking "export objects as groups," each object in the hierarchy will be placed into a separate folder in the final Core template for easy texturing. In other words, split up your mesh based on like-textured polygons.
4. Run obj2pbt.exe and a small window will open with a single button, allowing you to select a .obj file
5. The program will close when finished, and you can find the generated .pbt file in the same directory as the .obj
6. Copy/move the .pbt file into your project's 'Templates' folder (make sure the world is closed in Core)
8. Your hierarchy will be flooded with a bunch of wedges separated into folders based on "export objects as groups."
9. Work your way down the hierarchy by selecting all wedges in a given folder simultaneously, and apply textures in bulk.
4. Run obj2pbt.exe and a small window will open with a single button, allowing you to select a .obj file
5. The program will close when finished, and you can find the generated .pbt file in the same directory as the .obj
6. Copy/move the .pbt file into your project's 'Templates' folder (make sure the world is closed in Core)
- [CoreMapsFolder > Saved > Maps > yourMap > Data > Templates] (the Templates folder will not exist if you haven't created at least one template. In that case, you can just right click and create the folder manually.)
8. Your hierarchy will be flooded with a bunch of wedges separated into folders based on "export objects as groups."
9. Work your way down the hierarchy by selecting all wedges in a given folder simultaneously, and apply textures in bulk.
